can successfully plant a braided hibiscus tree directly in the ground-but only if you meet three non-negotiable conditions: (1) You live in USDA Hardiness Zones 9b-11, where winter lows stay reliably above 25°F (-4°C); (2) Your site receives at least 6-8 hours of direct sun daily with excellent drainage-no standing water after rain; and (3) You plant in late spring, after all danger of frost has passed and soil temperatures consistently exceed 65°F (18°C).
Outside these parameters, the braided trunk will not survive winter, roots will rot in compacted soil, or growth will stall entirely. This is not a matter of technique or fertilizer-it’s botany and climate reality. Hibiscus rosa-sinensis, bred for ornamental form-not cold tolerance or deep root establishment. They thrive in containers precisely because we control their environment. Planting one in-ground demands rigorous site selection, precise timing, and ongoing microclimate management.
What is a braided hibiscus tree?
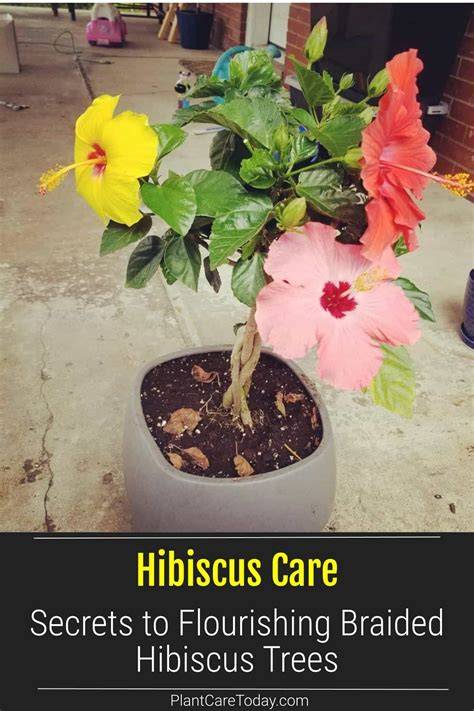
The term “braided hibiscus tree” is a marketing label-not a botanical classification. What you’re buying is a Hibiscus rosa-sinensis (tropical hibiscus) trained onto a single upright stem, with multiple young canes twisted together and secured while green and pliable. Over time, the stems fuse slightly at contact points via natural callusing, but they never develop true woody secondary growth like an oak or citrus. The trunk remains herbaceous at its core, with thin bark and minimal cambial activity beyond the first 12-18 inches above soil line. This structural reality dictates everything about in-ground success.
Zones, climate, and microclimates
Unlike native trees or even hardy shrubs such as rose of Sharon (Hibiscus syriacus), tropical hibiscus lacks dormancy mechanisms, lignin reinforcement, or cold-acclimation proteins. Its vascular system shuts down irreversibly below 28°F (-2°C). Frost cracks the bark, freezes sap in xylem vessels, and triggers rapid cell death in cambium layers. A braided trunk offers no advantage here-it simply concentrates vulnerability into one visible structure.
That said, many gardeners in Zone 10a (e.g., coastal Southern California, central Florida, lower Rio Grande Valley) have grown braided hibiscus in-ground for 5-12 years with careful management. Success hinges on understanding that this is managed perennial cultivation, not “plant and forget” tree gardening. It requires annual pruning strategy, seasonal mulch adjustment, and proactive pest monitoring-not passive growth. USDA Hardiness Zones provide a foundational starting point-but they’re insufficient alone for braided hibiscus. Frost frequency, not just minimum temperature: A single 27°F night in Zone 9b may kill an unacclimated plant, while repeated near-freezes in Zone 10a (e.g., 30-32°F for 3+ nights) cause cumulative stress, leaf drop, and latent bud dieback-even without outright trunk kill. Soil temperature consistency: Roots need sustained warmth. Soil at 4” depth must hold ≥65°F for 10+ days before planting.
Site selection and soil readiness
Use a soil thermometer-not air temps-to verify. Inland Zone 10 locations often hit safe air temps in early April, but soil lags by 2-3 weeks. Microclimate buffers: South-facing brick walls, raised beds over gravel, or proximity to heat-retaining structures (e.g., stucco homes, paved patios) can lift localized soil temps by 5-8°F. Conversely, low-lying areas, dense shade, or north-facing slopes add risk-even in Zone 11. If you’re in Zone 9a or colder, planting a braided hibiscus in-ground is strongly discouraged. Instead, use a large, insulated container on casters for winter mobility.
Step-by-step planting sequence
- Plant only between May 15 and June 30 in Zones 9b-10a; between April 20 and June 15 in Zone 10b-11. Never plant before soil at 4” depth reaches 65°F for three consecutive days. In most coastal Zone 10 locations, this aligns with the end of the “May gray” marine layer. Use a digital soil thermometer-not guess.
- Drainage you can verify: Dig a 12”-deep, 12”-wide hole, fill with water, and time drainage. If water remains after 4 hours, the site is unsuitable-even with amendments. Do not attempt to “fix” poor drainage with gravel trenches or raised mounds unless you’re installing French drains.
- Tropical hibiscus thrives in slightly acidic, well-aerated loam (pH 6.0-6.8). Avoid heavy clay or pure sand. For clay soils: Mix in 30% aged pine bark fines (¼”-½” size) and 10% composted coconut coir. Do not add peat moss (it acidifies excessively and compacts over time). For sandy soils: Blend in 25% high-quality compost (fully cured, weed-seed free) and 15% expanded shale (¼” grade). Avoid manure-based composts-they burn tender roots. Never dig a “perfect hole” deeper than rootball height. A too-deep hole causes settling, collar rot, and oxygen starvation. Width should be 2-3× rootball diameter-but loosen only the outer 2” of native soil wall to encourage outward root growth.
- Do not remove the nursery pot until immediately before placing in the hole. Soak the rootball in room-temperature water for 20 minutes prior to planting-this rehydrates compressed roots and reduces transplant shock. Gently tease apart circling roots at the bottom and sides with fingers (never knives or shears). Place so the top of the rootball sits ¼”-½” above surrounding grade-this prevents water pooling at the trunk base. Backfill with native-amended soil, tamping lightly every 3” to eliminate air pockets. Water slowly and deeply (15-20 minutes with a gentle hose wand) until water pools slightly-then stop. Apply 2” of shredded hardwood mulch, keeping it 4” clear of the braided trunk base. Overwatering kills more in-ground braided hibiscus than cold or pests-especially in the first 8 weeks.
Weeks 1-2: Water every 2 days (1 gallon per 12” of rootball height), applied slowly at the drip line-not the trunk. Weeks 3-6: Reduce to twice weekly, but increase volume to 1.5 gallons. Check soil moisture at 3” depth with your finger before each watering-if damp, skip. Week 7 onward: Water only when the top 2” of soil is dry to the touch and crumbly. Mature plants rarely need more than 1 inch of water per week-including rainfall. Use a rain gauge-not assumptions. Signs of overwatering: yellowing lower leaves, mushy stem base, lack of new growth despite warm temps, or algae/mold on soil surface. Signs of underwatering: crisp, inward-curling leaf edges, premature flower bud drop, and brittle new stems.
Fertilization, pruning, and ongoing care
Braided hibiscus in-ground responds poorly to high-nitrogen or slow-release fertilizers. Their shallow, fibrous roots absorb nutrients best from frequent, dilute applications. Use only water-soluble, balanced fertilizer with micronutrients (e.g., 9-3-6 or 10-4-12) diluted to ¼ strength. Apply weekly from May through September. Stop entirely October-March. Never apply fertilizer to dry soil or during heat waves (>95°F/35°C). Compost tea (aerated): Brewed 24-36 hours, strained, applied weekly at 1:10 dilution. Boosts beneficial microbes without salt buildup. Fish emulsion + kelp blend: 2-3-1 + 0-0-4 ratio, applied every 10 days at half label strength. Provides nitrogen in amino-acid form plus cytokinins that support braided stem integrity.
What to avoid: Epsom salt drenches (causes potassium imbalance), coffee grounds (raise pH unpredictably), and bone meal (too phosphorus-heavy, promotes leaf over flower).
Pruning: Shape Preservation vs. Pruning a braided hibiscus in-ground differs fundamentally from container care. Goal: maintain braid visibility while encouraging lateral branching below the braid zone-not upward height. Best practice: Prune in late February or early March, just as new leaf buds swell but before active growth begins. Never top-prune the main braid or cut into older, woody sections-this invites disease and rarely stimulates regrowth. If the braid loosens over time (common after 3+ years), gently re-braid new flexible shoots in late spring using soft cotton twine-not wire or zip ties.
Pests, diseases, and monitoring
Hibiscus beetle (Popillia japonica): Feeds on flowers and leaves. Hand-pick at dawn; apply neem oil spray only if >5 beetles found per plant. Root knot nematodes: Cause stunting and yellowing. Prevent with marigold interplanting (‘NemaGuard’ variety) and soil solarization before planting. Armillaria root rot: Fatal fungal disease in poorly drained sites. No cure-only prevention via strict drainage adherence. Sooty mold: Secondary to aphid or scale infestation. Wash leaves with water spray; treat insects-not the mold. Proactive monitoring beats reactive spraying. Inspect undersides of leaves weekly. Keep a garden journal noting first appearance of pests, weather patterns, and pruning dates. This reveals local cycles-e.g., aphids often peak 10 days after first summer rain.
In Zone 9b-10a, assume winter protection is required every year. Do not wait for frost warnings. When forecast drops to 35°F (2°C): Drape lightweight frost cloth (0.55-1.0 oz/yd² weight) over entire plant-secure at base with bricks or landscape pins. Do not use plastic-it traps condensation and worsens freeze damage. If freeze lasts >2 nights, add outdoor-rated incandescent string lights (not LED) under cloth for gentle radiant heat. Remove cloth daily when temps rise above 40°F (4°C) to prevent overheating and humidity buildup. Never wrap trunks with bubble wrap, burlap, or heating cables-these trap moisture and invite rot or burns.
Common myths debunked
- “Braiding makes it stronger”: False. Braiding is purely aesthetic. It does not improve wind resistance, drought tolerance, or disease immunity. It concentrates vulnerability into one visible structure and can restrict phloem flow.
- “It’ll grow into a real tree over time”: False. H. rosa-sinensis does not undergo secondary thickening. Trunk diameter increases minimally-typically <1” over 5 years-and remains vulnerable to breakage.
- “More fertilizer = more flowers”: Harmful. Excess nitrogen produces lush foliage but few blooms-and weakens cell walls, inviting pests. Bloom production correlates more closely with consistent light hours and potassium availability.
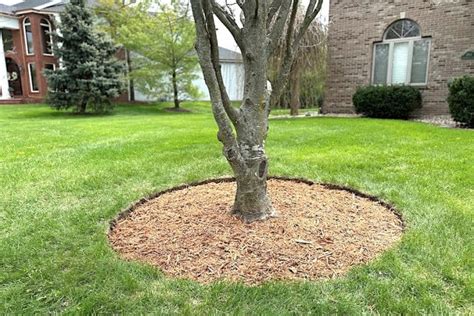
- “Mulch should pile against the trunk”: Dangerous. This creates perpetual moisture, inviting crown rot, Phytophthora, and rodent nesting. Always maintain a 4-6” trunk-free mulch ring.
Frequently asked scenarios
Can I plant a braided hibiscus in-ground in Zone 8? No. Even with heavy winter protection, prolonged exposure to 15-25°F causes irreversible vascular damage. The plant may resprout from the base, but the braided form-and grafted cultivar traits-will be lost.
How deep should I plant a braided hibiscus in-ground? Plant so the top of the rootball sits ¼”-½” above surrounding soil grade. Never bury the graft union (visible bulge 2-4” above rootball). Deep planting suffocates roots and invites collar rot.
Do I need to stake a braided hibiscus after planting in-ground? Only if planted in a known windy location or on a slope. Use a single, 6-foot hardwood stake driven 18” deep 4” from the trunk. Attach with wide, flexible tree tie-never wire or rope. Remove after 12 months maximum.
Will my braided hibiscus attract hummingbirds if planted in-ground? Yes-vigorously. In-ground plants typically produce 2-3× more flowers than container-grown peers, extending bloom season by 4-6 weeks. Ensure nearby water sources and avoid broad-spectrum insecticides that kill nectar-feeding insects hummingbirds rely on.
Can I propagate new plants from my in-ground braided hibiscus? Yes-but only from non-braided lateral stems, taken as 4-6” semi-hardwood cuttings in June-July. Do not take cuttings from the braided section itself-it rarely roots and won’t retain the form. Dip in 0.8% IBA rooting hormone, insert into perlite-vermiculite mix, and mist 3× daily under 70% shade cloth for 4 weeks.
Long-term outlook and renovation
Planting a braided hibiscus tree in-ground is a rewarding but exacting endeavor-one that rewards precision, observation, and respect for botanical limits. When done correctly-in the right zone, with verified drainage, timed to soil warmth, and tended with calibrated inputs-it delivers unmatched visual impact: glossy evergreen foliage, bold saucer-shaped blooms in scarlet, peach, or butter-yellow, and a sculptural presence no container can replicate. But it demands that you work with the plant’s physiology-not against it. Measure your soil. Watch your thermometer. Respect the frost line. And remember: the most beautiful hibiscus isn’t the tallest one-it’s the one still blooming in November, rooted deep, thriving where it was meant to be.
Final note on longevity: With optimal in-ground care, expect 6-10 years of vigorous performance in Zone 10a, 8-12 years in Zone 10b, and 10-15+ years in stable Zone 11 microclimates. Document your first bloom date, first frost date, and pruning events annually. You can own a braided hibiscus tree, even if you live in a colder climate!
Personal observations and related experiences
Caring for hibiscus trees in zones lower than USDA 9 requires a little extra effort. But the experience of selecting varieties at garden centers, transplanting into a planful container or bed, and watching blooms emerge over months can be deeply rewarding. For instance, when choosing a planter, look for one that's large and sturdy, yet still easy to transport inside and out. A large vase with drainage can work well for a container setting, while ensuring the plant still receives adequate light and warmth. Rotate plants often for equal light distribution, water when the top inch of soil is dry, and feed regularly with suitable fertilizer to encourage blooming. Prune frequently to encourage side-shoots and flowers, and move indoors before night temperatures drop to 40°F in winter in colder zones.
Care tips in practice
Hibiscus flower buds are delicate and can be damaged during transport, so choose plants with buds rather than fully open blooms when possible. Tropical hibiscus plants need a minimum of 6 hours of sunlight daily, and in containers can dry out quickly-consistent watering is essential. Fertilize every two weeks with an all-purpose liquid plant food to encourage blooming or opt for a time-release fertilizer. Prune to maintain shape and encourage new growth, and move outdoors or indoors based on temperatures.