Who would have thought they’d need instruction on how to wash their hair at this point in life? I sure didn’t! First of all, it depends on the day. If it’s an oil treatment day, go here.
Wet thoroughly without disturbing the canopy
Step under the shower stream and put your head back; do not touch your hair yet, just let it get nice and wet. Touching ruffles the cuticle, and you want to do this with curly hair as little as possible (the book describes it as velcro ― when you ruffle the cuticle the little shingle-like fibers that coat your hair shaft stand up and stick to each other or repel each other, causing a not-so-pretty halo effect). The top of your hair is called the canopy, and it needs to be left as un-interrupted as possible.
Conditional washing and conditioning routine
Start lifting your hair from underneath, making sure all of it is getting wet. When this is done, grab some conditioner. Put a good cherry-size dollop (give or take) on your fingers and start massaging your scalp. I usually need to use three of these dollops to get through my whole scalp, I do front, middle, then back. Massage until you feel like you’ve done a thorough job of removing build-up. Completely wash this out by scrubbing your scalp with your fingertips under the shower stream. You are still going underneath the hair to access your scalp, never ruffle the top of it. Basically, you are reaching up under your hair from the sides to get to the scalp, not coming straight through the top. Try to touch your actual hair as little as possible while doing this.
Once it’s completely washed out, flip your head upside down. This time, use your higher-quality conditioner, because some of it will be left in the hair. Pull all of your hair forward and down, so it’s hanging like a curtain around your face. Use about a cherry-size amount of conditioner again and pull it gently through your hair going downward. Do not comb it through the hair, as this will separate the curl families. It’s more of a gentle coating. This part is important: If you have very curly hair and you want it to dry longer and less tightly-wound, always pull down and never ever scrunch. Distribute the conditioner evenly, then flip your hair back again and stand under the stream for a few seconds. Leave in about 1/3 of the conditioner. It should still feel slightly silky, a bit like wet seaweed. This is where the skill of it comes in: Over the months and years to come, you will probably do a lot of experimenting with how much conditioner to leave in your hair. This depends on the time of year, your hair’s density, and your own preferences. You leave more in in the winter and summer (dryness and humidity) than you need to during the more temperate seasons. If you live in a dryer climate you may always need to do this, and the same goes with the humid climates. In my experience, my hair always looks amazing in Colorado or Arizona. The dry weather just shines it up so nicely and eliminates all frizz. It doesn’t quite make sense to move for my hair, though!
Rinse and refinish with careful product layering
After washing out 2/3 of the conditioner (literally takes seconds) flip upside down again. Next we apply the gel using the same method. Take about a grape- to cherry-sized amount and rake it through your hair going carefully downward. Flip back up carefully, finish up whatever you have to do, and get out! (Note: I always do my hair last.)
Towel technique and minimal disturbance
Grab a few micro-fiber towels if you don’t have one already. The book recommends an old t-shirt or micro-fiber towel, because you don’t want to use the thicker-pile body and face towels on your delicate hair. Remember, we are still trying to disturb the shaft as little as possible, and the softest material is the best way to do this. Again, you will use the towel to squeeze your hair out going downward. Your head can be right-side-up for this. NEVER RUFFLE. And never scrunch, unless you want to make your hair curlier. In that case, scrunch away.
The Massoud method and after-shower care
The Massoud sisters, curly queens. The Process Alright, so you are fresh out of the shower after giving your gorgeous hair some love with alcohol & sulfate free shampoo and conditioner (for real, it’s important, check out why here) and you’re ready to tame it. First Step Make sure your hair is soaking wet. This is important because your hair absorbs products more when it is wet thanks to the moisture opening your hair folicule. Find yourself a spray bottle and drench it (don’t forget your roots!) Second Step When your hair is dripping, you are ready to apply a leave in conditionner or a curl cream. This gives your curls moisture (what they thrive on) and makes them soft and shiny! If you have thick hair, separate it into sections. Then, take a quarter size amount of your product into your palm and spread it out on both your hands. Third Step Very important - Rake the product through your hair. Raking means seperating your fingers so that they create a type of wide-tooth comb. You want to rake your hair in a perpendicular direction to how it falls (Basically, sideways since it falls downward and for the curls on top of your head, you want to rake your curls towards the ceiling). Do this all through your hair. Fourth Step SCRUNCH. Do I have to explain what that is, because it’s exactly what it sounds like! Flip your head upside down, create a claw-like shape with your fingers and cup your hair at the bottom. And then, scoop your hair towards your head while squeezing your fingers to scrunch! The one way of knowing that you’re doing it right is that you’ll hear a squishy-sound when you scrunch and water should be dripping from your hair! That’s the magic sound ladies, listen for it. If you don’t hear it it means you don’t have enough water or product, so simply add more water to start and then add product if you need to. Fifth Step Almost done! Leave your hair to air dry for a good 45 minutes or till whenever it becomes damp. The longer you let it air dry, the more defined each curl will be. Simply because the strong airflow of a diffuser hits the curls much harder and if they haven’t had time to dry in their shape, they’ll get messy. The best after-shower routine for curly hair involves gently detangling, applying a leave-in conditioner, scrunching in a curl cream or gel, plopping for moisture retention, and air drying or diffusing. If you have curly hair, you know the struggle is real when it comes to frizz, dryness, and lack of definition. The unique structure of curly hair strands makes them more vulnerable to dehydration and environmental stressors. Those gorgeous bends and coils create friction, causing the cuticle to lift and allow moisture to escape easily. Without a solid post-wash routine, your curls can quickly become a dry, frizzy mess. Not all curls are created equal, and each curl type has its own unique needs. Your curly hair routine should be tailored to your specific curl pattern and hair porosity. Tight, coily curls tend to be drier and more prone to shrinkage, while looser waves may require less intensive moisture. Similarly, low-porosity hair struggles to absorb moisture, while high-porosity hair can become dry and brittle if not properly hydrated. Understanding your curl type and hair needs is the first step to finding the perfect routine. Think of the below routine as a general blueprint catered to curly hair. Raise your hand if you’ve succumbed to the dreadful “bird’s nest” after shower situation. To avoid disturbing your curl pattern and causing frizz, always detangle soaking-wet hair that has been coated with a slippery conditioner or detangler. Ditch the paddle brush - it’s far too rough on curls. A wide-tooth comb or detangling brush designed for curly hair will seamlessly navigate through knots without snagging or causing breakage. Start detangling from the ends and work your way up slowly and gently. After detangling, you’ll want to replenish that all-important moisture right away by applying a curl-friendly leave-in conditioner. Your leave-in conditioner is the MVP of your curly hair routine, providing essential moisture and slip to enhance your curl pattern. Choose a leave-in formulated for your specific curl type and needs. Make sure to apply your leave-in from the mid-lengths to the ends while your curls are still completely soaked. Distributing the product on dripping wet hair allows for maximum absorption and even application. When applying your leave-in, experiment with different techniques like raking it through your hair, scrunching it in, or using the “praying hands” method. Time to lock in that curl formation and enhance definition! Curl creams are my go-to styling product because they combine moisturizing ingredients with flexible hold. They’ll give you frizz control and defined clumps without any crispiness or crunch. If you’re looking for an even more powerful hold and elongated curl formation, a gel could be your best bet. The downside is that gels tend to cause crispiness and require more strategic application to avoid a crunchy cast. After getting your styling product evenly distributed, you’ll want to employ the magic technique of plopping. Gently wrapping your wet curls into an old cotton t-shirt or microfiber towel allows them to form their natural curl pattern undisturbed while soaking up excess moisture. Plop for 15-30 minutes to allow the moisture from your leave-in and styler to really sink in. Micro-plopping may work better than full-plopping if you have shorter curls or a tighter curl pattern. The technique is the same - wrapping your curls in a towel or shirt - but you only leave it on for 5-10 minutes before releasing and fluffing out your hair. Once your curls have formed thanks to plopping, you’re ready for the final drying stage! Air drying is the gentlest way to preserve your natural curl pattern and avoid frizz from disturbing the strands. However, it does take some serious patience as curly hair can take several hours to dry completely this way. Diffusing, on the other hand, uses the concentrated airflow of a diffuser attachment on your blow dryer to gently dry and set your curls. For times when you’re in a rush or want to get on with your day, diffusing with a blow dryer on a low, cool setting can cut your drying time in half. This can lead to more volume and definition but requires careful technique to avoid frizz. That’s it.
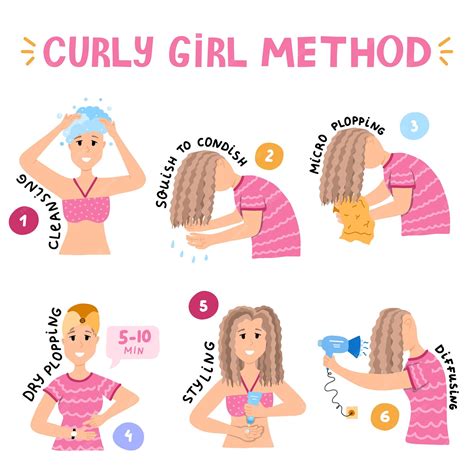
My Curly Hair Routine 🧡 Step by step wash day
Understanding your curl needs
The tightly coiled, coily, and wavy patterns each have unique moisture and porosity needs. Not all curls are created equal, and each curl type has its own unique needs. Your curly hair routine should be tailored to your specific curl pattern and hair porosity. Low-porosity hair struggles to absorb moisture, while high-porosity hair can become dry and brittle if not properly hydrated. Understanding your curl type and hair needs is the first step to finding the perfect routine.
Practical blueprint for a consistent routine
- Always detangle soaking-wet hair with a slippery conditioner or detangler using a wide-tooth comb or detangling brush designed for curly hair.
- Apply a leave-in conditioner from mid-lengths to ends while hair is dripping wet.
- Rake the leave-in through your hair, then scrunch or use other techniques to enhance curl formation.
- Use a styling product (curl cream or gel) evenly, then plop to preserve moisture and shape.
- Air dry or diffuse on a low, cool setting to minimize frizz and maximize definition.
Think of the below routine as a general blueprint catered to curly hair. The after-shower care helps avoid frizz, defines the curl pattern, and respects the delicate structure of curly strands. The goal is to minimize cuticle disturbance, maintain moisture, and encourage natural curl formation through careful technique and appropriate products.