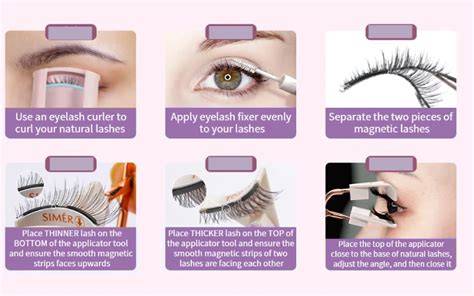
Magnetic eyelashes have taken the beauty world by storm, offering a reusable alternative to self-adhesive lashes and the glue-tweezers struggle many beginners dread. Our verdict: Worth trying if you hate lash glue.
Why choose magnetic lashes for beginners
With so many brands now selling magnetic eyelashes, it was hard to know which one to go for. So, I immediately went online and found that they have a huge variety of different lash styles. I wanted them to look natural-ish but also thick. This means not so natural that they looked sparse but not in-your-face fake looking either.
What to expect from the application process
The best piece of advice I can give when it comes to magnetic lashes is to practise applying them days before your event. And you can with magnetic lashes because they’re reusable.
In my set was a magnetic eye liner, corrector pen and the box containing my lashes. Unlike self-adhesive lashes, it’s not so much the application of the lashes that’s tricky. So, doing a practise run is vital so that you can get used to how much of the liner to apply, how long it takes overall to apply the lashes and how to place them on the liner properly.
The instructions say to apply three lines of the magnetic liner and to wait for each one to dry until you apply the next one. The liner takes a while to dry as it is quite thick so bear that in mind on the day and put plenty of extra time aside. Try to apply your liner as closely to the root of your top lashes as possible. Your faux lashes will sit wherever the line is and you don’t want to be able to see a gap between your natural lashes and your fake ones.
It’s really useful to have the corrector pen handy, if your kit comes with it, in case you make any mistakes. The liner formula is so unique - and can get quite sticky - so not many standard eye makeup removers take it off neatly and using the corrector pen is your best option. Once you’ve applied your third line of liner, wait for it to dry and you can then apply your lashes.
I made sure I filled in any gaps with a black eyeliner pencil beforehand as I knew I wouldn’t be able to do this after the lashes were on. This is where I got nervous. I mean, I was already twitching over the amount of black eyeliner I now had on - not my usual look - but I knew that it would eventually be covered by the lashes. As long as I didn’t mess it up.
Placing the lashes and dealing with the fit
When I picked up my first lash piece, I could see the mini spaced-out magnets along the line. I went along with it and fed one corner of the first lash to the inner corner of my magnetic liner. I then fed the rest of the lash along the magnetic line. Excitedly, I waited for the lash to ‘click’ into place, like you see on Instagram. There was no click. There was a tiny bit of ‘stick’ but I didn’t feel confident letting the lash go. So, I went again, this time pressing my finger down onto where the lash should be ‘clicking’ as I went along the line. Finally, the lash stayed put. Looking up close in my magnified mirror, I could see a slight gap between my natural lashes and magnetic ones. But the more I stepped back from the mirror, it got less noticeable, and I realised that no one at my party, except maybe my husband if he was feeling particularly romantic, would be looking at me that closely.
I went ahead with placing the other lash piece on my left eye and used the same technique of pressing it into place (again, no ‘click’) and was pretty proud of my finished look, actually. Once they’re on, they’re on and then you don’t really think about them.
Removal, maintenance, and practical tips
My plan was to gently ‘unclick’ them from their magnets and then back into the box they’d go, ready for the next wear. However, it wasn’t quite as simple as that. It takes a bit of force to pull them off (which, to be fair, proves my point that they are sturdy). And you have to be careful not to pull your natural eyelashes out as you go. And then there’s the mess. You need to use something like a pair of tweezers to pick the leftover liner off the lash magnets once your lashes are off. The stringy glue gets all around your eyes too, for obvious reasons. Don’t use tweezers here, instead try to grab most of it with your fingers and take the rest off with eye makeup remover.
Real-world user experiences
Other users seem to agree with me, with Fiona C saying, “These lashes were so easy to apply! They stayed put all night and never bothered me one bit!” You can buy a set of magnetic Lola’s Lashes for £14 in the UK (and $27 in the US) but that only includes the lashes, no corrector pen or magnetic eyeliner. The eyeliners are £14 in the UK ($27) and the Makeup Remover pen is £8 ($16). Once you’ve bought the set and you’ve exhausted your lashes, you’ll probably only need to top them up for £14 ($27) which I think is very reasonable.
Since buying my magnetic lashes, I wouldn’t say I’ve worn them 30+ times. It’s worth noting though that the last time I wore them it was around wear number 5. They definitely weren’t sticking as well as they used to, and they were a little harder to get on that time as well. Maybe I need to clean them more thoroughly or I need to replace my magnetic eye liner as it has been almost a year now. If you can get past that though, they really do live up to all expectations when you’re actually wearing them. My lashes looked amazing even if I do say so myself. I love that Lola’s Lashes offers so many different styles so that everyone can find a set that works for them. And, with practise, they are relatively easy to apply. If I can apply them using minimal curse words, anyone can.
Practical takeaways for beginners
- Practice makes perfect: run a few trial applications before a special occasion.
- Choose a set with a magnetic eyeliner and corrective pen to minimize mistakes.
- Place lashes along the liner with gentle, steady pressure to avoid gaps.
- Expect a little initial struggle and plan extra time on event days.
- Remove carefully and clean magnets and liner to extend wearability.