The slicked-back bun made famous by It girls like Hailey Bieber, Bella Hadid and Sofia Richie Grainge has the power to instantly elevate jeans and a leather bomber to stealth-wealth status. But then I met Kathleen Riley, the hairstylist responsible for Sofia Richie Grainge’s sleek bun for her wedding in 2023, and many of her slick red-carpet updos since. I had the chance to sit down for a lesson and styling session with the Nexxus spokesperson and shyly pointing to a Pinterest pic, I asked if Richie Grainge’s centre-parted style would work on me. Instead, Riley blow-dries strands straight, focusing on getting the roots flat and smooth. Since my hair is already dry, Riley grabs the flat iron. One of the key elements to this look is a flawless part. “It has to be perfect: no flyaways, and perfectly straight all the way to the back,” stresses Riley. “You can’t be scared of product, especially at the root,” she tells me, as though using an ocean of hairspray and enough hair wax to fill a small canyon might deter me. In Riley’s hand the whole time? A wax stick. She warms up the wax on the back of her hand and then glides the stick down my roots along my part to tame those flyaways first. To smooth frizz and broken hairs, hold the can of hairspray super close to your roots. If you’re like me and usually wait until the end to use hairspray, forget that idea. “Getting product in between steps is super helpful,” says Riley. She uses hairspray the same way she uses the wax stick, spraying each and every section of my roots. You can also forget about holding the can eight inches away, like you might for a blowout. Instead, spray about one inch from the root for max concentration. Here’s the magic trick: you’re actually creating three ponytails, not one. Pull your hair into sections on each side of the part, and a third rear section from the back of your crown, down. Riley combs back the rear section first, pulling firmly while securing the ponytail with the same no-snag Blax rubber elastics that she used on Richie Grainge’s wedding day. “The important thing with the back section is it’s going to determine where the bun lives,” she tells me. Next, brush back each side section, one at a time, merging with the base ponytail using a separate elastic. Celebrity hairstylist Kathleen Riley creates a rope braid before twisting into a bun. Because my hair is fine, Riley uses a texture spray to bulk up my lengths. Next, she creates a two-section rope braid, then twists it up into a bun, holding it in place with a few bobby pins. We decide to leave the ends untucked for an origami-inspired shape. My eyes almost pop out of my head when the blowdryer emerges, knowing in my amateur hands this could kick up strays. But Riley recommends using the blowdryer and pressing with your fingers to “cement” down hair to lock it all in. The final style in all its sleek and smooth glory. Personally, I loved that the super sleek bun gave me a radically different look without having to resort to a haircut, like putting on a mini skirt when all you ever wear is lounge pants. It left me feeling emboldened to experiment with styling even more. If you don’t like it, it’s just hair.
This article contains affiliate links, which means The Kit may earn a small commission if a reader clicks through and makes a purchase. All our journalism is independent and is in no way influenced by advertising. For over 15 years, The Kit has been the leading authority on fashion and beauty for Canadians. We provide expert-led insights on what is worth your time, money and energy by collaborating with the country’s top stylists, designers, hair and makeup artists, dermatologists, plastic surgeons and industry specialists.
When it comes to effortless hairstyles, is there anything better than a bun? Whether it's a messy bun, high bun, sleek up-do or slickback, the hairstyle has endured over the decades for its versatility and easy style. They can be dressed up for elegant events or kept messy for an everyday, ‘Oh, I just threw this look together’ type of vibe. Most recently, slicked back buns have been trending, thanks to the rise in ‘clean girl’ aesthetics, and the fact that they look good with just about any ‘fit, from your weekend Pilates class get-up to a sleek formal evening style. But other buns have had their moment in the limelight, too - notably Pamela Anderson’s perfectly tousled '90s bun that featured perfectly placed tendrils of curls trailing down to the frame the face.
How to Nail the Perfect High Bun: Expert Techniques
To find out how to nail the perfect high bun look, we speak to Jake Unger, stylist at Larry King Marylebone. Here are his expert tips below: Work with clean hair; however, day two hair can also be great for adding some grit and volume. Prep with Larry King My Nanna's Mousse to help give it a little bit of shine, but also some hold. Blowdry your hair, blowing it back off of your face. Pull out any bits you might want to fall around the front hairline. This can be really nice to do on one of your face, to give a cool parting. Divide the hair into two, so that you gather the back area behind the ear to the top of the head. Comb it all into a ponytail where you want the bun to start, securing it with an elastic. Then put your centre parting in, drop out the piece that you’ve kept out (if you want to), then drag everything back into that original ponytail. A nice method is to twist the hair once it’s in the ponytail and wrap it around itself, fix this with an elastic or some pins. The best pins are Japanese pins from a place called Session Kit. They have little grooves in them so that the hair doesn’t fall out. Really worth investing in! Finish off the hair with the Larry King Flyaway Kit, to go around all the edges. Put a bit on the back of your hand and use the brush to tame your hair, then fix with some hairspray.
Practical Steps for a Sleek High Bun
- Start with clean or day-two hair for added texture and grip.
- Prep with a shine-hold mousse to reduce frizz and add control.
- Blow-dry hair back and part precisely for a flawless line.
- Create three sections: two sides and a rear crown section; secure into a base ponytail.
- Carefully merge side sections with the base ponytail and secure with elastic(s).
- Twist the ponytail (or rope-braid) into a bun, pin in place with reliable pins.
- Use a texture spray to bulk fine lengths and cement stray hairs with a small amount of heat and pressure.
- Finish with targeted hairspray close to the roots to lock the look in.
Texture, Tools, and Finishing Touches
In Riley’s method, the back section determines the bun’s location, while the front sections merge with the base ponytail for a seamless silhouette. A rope braid built from two sections adds architectural interest before twisting into an elegant bun. For finer hair, texture spray creates the volume needed to hold the shape, and bobby pins secure the twist. The final result is a sleek, smooth silhouette that can feel radically different without a haircut.
If you’re aiming for a modern, editorial vibe, a high, centered part with a perfectly flat root area is essential. You can achieve this with precise parting, wax at the roots, and close-range spray to keep everything anchored. The look works across casual and formal outfits, elevating any ensemble from basics to a statement.
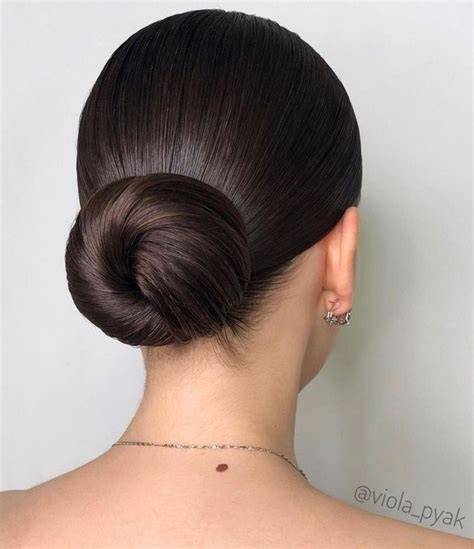
‘clean girl’ slick bun tutorial
Looking for inspiration? We've got you covered.
tags: #sleek #high #bun #hairstyles