These two techniques share the same concept, however the methods and results are very different and this can be confusing. The Concept behind both is this: Typically, a lighter shade is applied over a darker shade in a way that maneuvers the brush over the crevices allowing the darker shade to show through partially or completely which accentuates the detail and provides contrast & depth. If you have been using one technique for a long time, it can often be difficult to successfully master the other because habit and muscle memory can take over, which leaves us trying to mix the two methods and therefore gives us poor results. This frustration can often cause us to stop attempting to learn or make us doubt that the technique even works at all. I can assure you, both techniques work when done correctly. Even though I am a firm believer in Wet Brushing the majority of the time, and I'll tell you why below, I still believe that there are certain situations that are appropriate for dry brushing and it's good to know how to do both.
Keep in mind as I attempt to explain the differences and benefits below, I am speaking from my own painting and teaching experience in my area of the world. You may have been taught differently or exposed to a different method by the same name, but below I will share a brief summary here of the techniques as I use them. I will be explaining the methods using Non Fired Acrylic Paints, though they can both be used with other products.
What is Dry Brushing? Technique, Materials, and Finish
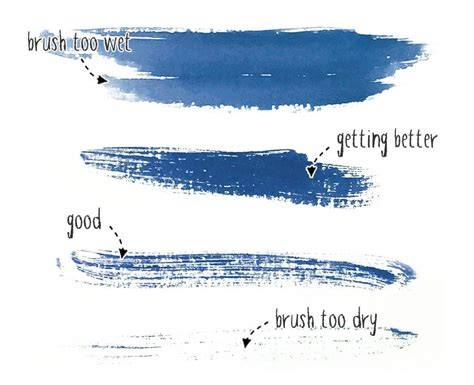
Dry Brushing is done with dry stiff bristle brush, pouncing out as much color as possible on scratch paper, then applying to the piece by brushing against the grain in a swiping and or rubbing motion. The paint is applied to the raised texture and stays out of the crevice detail. You repeat the process several times building even fuzzy layer after layer until the desired coverage is achieved. You don't want to dip your brush in water. If you want to use a clean color, you usually use a clean dry brush, or you have to clean your brush and dry it repeatedly against a towel to remove moisture. "Moisture is not your friend".
When using Chalk Paint® or similar products, the secret to dry brush painting is to apply the paint with the very tip of your brush. Work with a clean, dry brush and scrub it over the surface you’re painting. Use a stabbing motion to really push the paint into any crevices. When dry brush painting, we like to work with two paint colours to create a layered look. Your first coat - or base coat - can be a contrasting or complementary colour to the second. You want to apply your base coat as normal and use a dry brush for the second coat. You can apply Chalk Paint® using a dry brush or wet brush technique. The difference really is in the finish you’ll achieve.
For a smooth, even look, you want to really charge your paint brush with Chalk Paint®. The brush is wet with paint meaning it will go really far and give the best coverage. Dry brushing paint will not give great coverage. But that’s the intention! You are trying to achieve a rough and uneven finish. When you dry brush, you don’t want to cover the whole surface but rather reveal some of the substrate. So you’re ready to try dry brush painting? Here’s where to start. First you need to choose your Chalk Paint® colours. You want one colour for the first coat and a contrasting colour for the second. Make sure you have a great brush to hand. Chalk Paint® Brushes are strong yet pliable and cover lots of surface area quickly. Apply a first coat of Chalk Paint® onto your piece of furniture. Move your brush in every direction to create a bit of texture and to achieve full coverage.
Take a clean, dry Chalk Paint® Brush. Dip the tip of the brush in Chalk Paint®. You only want the very ends to be charged with a small amount of paint. Apply your second coat of Chalk Paint® by wiping over the surface. Use the tip of the brush at first and then a scrubbing motion over the surface. Work quickly: you want to brush the paint out really well. Dry brushing Chalk Paint® is a great way to achieve a realistic worn look. It’s a great technique for a farmhouse or rustic country style, but can also be used over gilding leaf if you’re looking for a touch more glamour.
Dry brush your paint with a pale colour like Old White for a bleached effect and it wouldn’t look out of place in a coastal home either. If you’d like to try dry brush painting yourself, visit your local stockist to get all the supplies you need. Remember to also share your before and after projects with us online using #AnnieSloan. This technique can be applied to furniture as well as scenery and terrain for gaming tables, producing weathered, textured finishes that emphasize brush strokes and texture.
What is Wet Brushing? Technique, Moisture, and Immediate Coverage
Wet Brushing is done with damp soft taklon brush, loaded with water and paint, the brush is swiped against a scratch paper to work the color into the brush, and blotted on a paper towel to remove excess moisture. It is then applied to the piece by swiping the brush against grain, keeping the paint on the raised textured and out of the crevice detail. You load your brush often, "Moisture is your friend" (brush needs to stay moist, not dripping). The desired coverage is achieved almost immediately in one layer. You can clean your brush as often as needed and use immediately, no need to dry.
Wet-on-Dry vs. Wet Brushing explores similar principles but with different moisture control and finish. In painting large areas, you’ll typically choose appropriate sized brushes to avoid splotchiness, hard edges, and undesired textures. For a smoother, more uniform look, you’ll want the brush to be moist but not dripping, and you’ll often re-wet the brush as you progress to maintain a consistent flow of paint.
Glazing, Bleeding, and Gradients are related watercolor concepts that emphasize how moisture and layering influence color transitions and edge softness. A glaze involves applying a relatively watered-down layer over a prior dry shape to soften edges or correct mistakes. Bleeding occurs when clean water is placed along an edge to soften the boundary and allow color to spread. Gradients are achieved by applying a second darker color over a still-wet first color, sometimes aided by tilting the paper to leverage gravity.
Dry Brushing vs. Wet Brush in Practice: When to Use Each
In Summary, the difference Dry Brushing is done with dry stiff bristle brush applied in layers, vs. Dry brush painting is a great technique to try if you love the rustic look. It creates an authentic worn finish, well suited to a farmhouse or country aesthetic. Applying your paint with a dry brush will really bring out brush strokes. In this tutorial, we’ll guide you through everything you need to know about dry brushing using Chalk Paint®. The beauty with Annie Sloan’s brand of furniture paint is that it can be applied thickly or thinly, diluted with water to create a wash or here applied with a dry brush for a rustic finish. The secret to dry brush painting is to apply the paint with the very tip of your brush. Work with a clean, dry brush and scrub it over the surface you’re painting. Use a stabbing motion to really push the paint into any crevices.
When you dry brush, you can reveal the texture and tone of the underlying surface, making it ideal for rustic and worn looks. Wet Brushing, on the other hand, provides smoother coverage, quicker results, and can preserve fine crevices while still creating contrast through controlled moisture. The choice often depends on the desired finish: a dry brush yields tactile texture and a weathered appearance, while a wet brush produces smoother blends and more even coloration. Both techniques have their place, and mastering both gives you a versatile toolkit for a wide range of subjects and surfaces.
Practical Tips and Tools for Mastery
- Use a dry stiff brush for dry brushing and a soft damp brush for wet brushing.
- Keep moisture levels consistent: “Moisture is not your friend” for dry brushing, and “Moisture is your friend” for wet brushing.
- Experiment with color pairs: base coat and lighter/contrasting second coat to build depth.
- For chalk-based finishes, charge the tip of the brush and use light stabbing motions to push paint into crevices.
- Clean tools regularly; dry brushes can accumulate dried paint in the bristles, while wet brushes require proper blotting and re-wetting as needed.
Become a DRYBRUSH MASTER! The complete guide to drybrushing minis
In practice, many artists combine both approaches to achieve specific effects, but the key is to maintain clear control of moisture and the direction of brushwork to prevent muddy results. The end result is a spectrum of finishes from rough, textured rustic looks to smooth, blended surfaces, each serving different styles and purposes.
| Technique | Brush Type | Moisture | Finish |
|---|---|---|---|
| Dry Brushing | Dry stiff bristle | Low moisture | Rough, textured, reveals substrate |
| Wet Brushing | Soft damp taklon | High moisture (not dripping) | Smoother, faster coverage |