Lash mapping is an art form that allows lash artists to create personalized and stunning lash extensions. In this blog, we’ll reveal the secrets behind wispy lash mapping styles. Discover how to perfect your lash sets, gain insights into enhancing your wispy lash map, and explore a range of techniques and styles.
What are Wispy Lash Mapping Styles?
Wispy lash mapping styles are trendy for their natural, fluffy appearance and are great for a dramatic, eye-catching effect. It’s all about planning where to place different lash extensions based on their length, curl, and thickness to enhance your natural lashes and suit your eye shape. The best way to achieve this look is with eyelash extensions, using a combination of individual lashes (closed fans) and lash extension fans of varying lengths and curls to create a textured, spiky effect.
How to Achieve a Perfect Wispy Eyelash Extension Mapping?
- Client Consultation and Preferences: Start by discussing your client’s preferences and desired look. Understanding their style, lifestyle, and any specific requests will help tailor the best lash extension wispy map that suits their needs.
- Define Clients Eye Shape: Accurately defining your client’s eye shape is crucial for creating the most flattering wispy lash mapping styles. Understanding the specific characteristics of your client’s eyes will help you select the right lash lengths, curls, and mapping techniques. For more detailed information on matching lash extensions to various eye shapes, check out the Eyelash Extension Shapes guide.
- Precise lash mapping: Mapping wispy lashes is a detailed process that requires skill and practice. You can create wispy lashes in three ways: using classic lashes of different lengths, volume lashes, or a set of hybrids. The main challenge is picking the right lengths and where to place the spikes and consider how much weight your client’s lashes can handle and design a style that fits their eyes. Wispy Lash mapping styles are applied in two layers:
- The First Layer - Spikes: Spikes are typically 2-3 mm longer than the main layer and can be created using closed fans (for volume) or individual lashes (for classic and hybrid styles). Usually, there are 7-10 spikes per eye. To ensure durability, you can place two individual lashes or closed fans close together for each spike, so if one falls off, the other remains to maintain the look. Common choices for individual lashes are 10mm to 20mm in length, 0.07 - 0.10 mm in thickness, and C, CC, or D curls.
- The Second Layer - Fans: This layer uses 2-6D fans, also known as volume lashes, to fill in gaps between the spikes and add overall density. You should use fans that are 7mm to 14mm long, very thin (0.03-0.05mm), and in C or D curls. You should use volume fans (2D-6D) to create fans for the second layer.
Wispy Lash Styles
- Wispy classic lash extensions map are created by blending individual lash extensions of varying lengths. This style produces a fluffy effect, adding both length and a touch of volume to your natural lashes. It’s an excellent choice for those who want their classic lashes to stand out more.
- Wispy hybrid mapping blends the best of both worlds. This style features spikes made from individual lash extensions, with volume lash fans filling in the gaps between them. The result is a beautifully textured look that combines the definition of individual lashes with the fullness of volume fans.
- Wispy volume mapping is crafted by mixing various fans made up of 2 to 6 lash extensions. Spikes are formed using closed fans, while 2D to 6D fans are placed between these spikes to boost density and add a rich, voluminous effect. This technique creates a full, feathery look that stands out beautifully.
A Range of Wispy Lash Extension Map
There are different wispy lash mapping styles to choose from and all of them require different mapping.
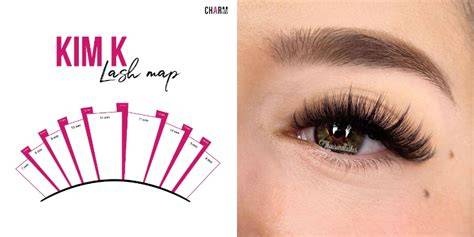
- Kim K wispy lash map is the most popular choice among wispy lash mapping styles. It’s inspired by Kim Kardashian’s signature style and features a range of lash lengths from 7mm to 12mm. Begin by mapping where to place the spikes, which should be 2-3 mm longer than the other lashes and are added at regular intervals. Note that you should use 7 to 10 spikes in total to avoid overwhelming the look. Then, fill in between the spikes with lashes that are 1-3 mm shorter than the spikes for a flattering look that suits any eye shape.
- Wispy Squirrel Lash Map is perfect for round eyes, creating an unique and charming look. It uses a gentle crisscross pattern with the longest lashes placed near the outer corners and shorter ones as you move inward. This technique mimics a squirrel’s eye shape, making your eyes appear larger and more captivating.
- Cat Eye Wispy Lash Map has always been a classic favorite! A wispy cat eye map enhances the outer corners of the eyes with a dramatic, elongated effect, mimicking a cat’s eye. This style features the longest lash extensions placed at the outer edges, creating a fluttery, winged effect.
- To achieve a stunning Wispy Doll Eye Mapping, start by placing the longest lashes, usually 12mm, in the middle of the lash line. Gradually shorten the length towards the inner corner with 11mm, and use 10mm, 8mm, and 9mm as you move to the outer edges. This mix of short and long wispy lashes creates a wide-eyed effect, giving your eyes a sweet, charming appearance.
Who is Suitable for Wispy Lash Mapping Styles?
Wispy mapping styles are the go-to for anyone craving a trendy, effortlessly cool vibe. They’re ideal for all eye shapes-whether your client’s eyes are almond, round, downturned, or upturned. With a customized wispy lash map, everyone can rock a chic, flattering look that’s tailor-made for their unique features. To find out which wispy lash mapping style best suits your eye shape, it’s a great idea to consult with a professional lash tech!
Tips to Avoid When Creating a Wispy Lashes Map
- Don’t Overdo the Spikes: Too many spikes can make the lashes look uneven or overly dramatic. Aim for a balanced number of spikes-usually 7-10 per eye-to keep the look natural and sophisticated.
- Avoid Mismatched Lengths: Using lengths that are too varied or not blending well can disrupt the flow of the lash map. Stick to a planned gradient of lengths to ensure a smooth, harmonious appearance.
- Don’t Skimp on Lash Curl Types: Using only one type of curl can make the lashes look flat. Incorporate different curl types to add depth and dimension when customizing your wispy lash mapping styles.
- Steer Clear of Uneven Density: Ensure that the lash density is consistent throughout the map. Sparse areas or overly dense sections can make the lashes look patchy or unbalanced.
- Don’t Ignore Natural Lash Health: Applying heavy or overly long lashes on weak natural lashes can cause damage. Assess the health of your client’s natural lashes and choose extensions that are appropriate for their condition.
- Don’t Use Poor-quality Products: Using low-quality lash extensions or adhesives can lead to poor results and potential damage to natural lashes. Choose us for high-quality products to ensure durability, safety, and the best outcome for your clients.
- Don’t Forget to Customize: Using a generic lash map without considering the client’s unique eye shape and preferences can lead to poor results. Always tailor the lash map to fit each client’s specific features and desired look.
Best Product for a Perfect Wispy Lash Map
Try our Wispy premade fan lashes, meticulously handcrafted using premium Korean PBT fiber for those who want convenience or are new to lash mapping! These lashes come in a variety of sizes and lengths, saving you time and effort. Soft, fluffy, and remarkably lightweight, they’re perfect for achieving various flawless wispy lash mapping styles!
So, have you soaked up all the wispy lash wisdom? Wispy lash mapping styles are your ticket to crafting trendy, effortlessly stylish looks that can be tailored to any eye shape. Whether you’re a newbie or a seasoned pro, mastering these techniques will elevate your lash game to new heights. If you're looking for the perfect wispy cat eye lash map, then look no further! We have compiled a list of our favorite lashes to help you find your next go-to pair. Here are some practical tips from experienced lash artists to guide your process.
The wispy lash style has become one of the most in-demand lash extension styles worldwide. With their textured spikes, soft volume, and eye-opening effect, wispy lashes create a strip-lash look while still being customizable for each client’s eye shape. If you’re a lash artist looking to master wispy sets, this guide will walk you through what wispy lashes are, popular lash maps, and pro tips for creating flawless wispy designs.
What Are Wispy Lash Extensions? Wispy lashes are created by mixing spikes (longer lashes) with layers of volume fans in shorter lengths. This creates a textured, feathery effect that looks bold but not too uniform. The key features of wispy lashes include spikes that stand out above the lash line, fluffy volume filling in between, a “messy-but-pretty” strip lash look, and lots of dimension and texture.
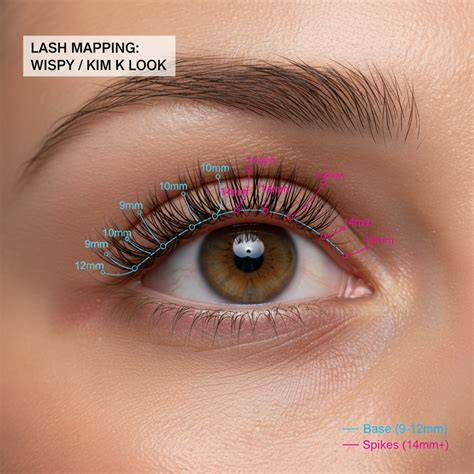
How to create a LIGHT HYBRID WISPY/SPIKE SET
Popular Wispy Lash Maps
Here are the most commonly used lash maps for wispy sets. Lash Lengths, Curls & Thickness for Wispy Sets: Lengths: 8mm-15mm (spikes usually over 3 mm longer than base). Curls: D, DD, L, or M curls for bold and lifted results. Thickness: 0.03-0.07 mm, depending on whether you’re creating handmade or premade fans. Fans: Narrow fans for textured spikes, fluffy fans for filling.
The style works for every occasion-from natural wispy classics to mega volume spikes. Clients are asking for “Kim K lashes” by name, making it a profitable style for lash artists.