There is never a rush during any part of the microblading process, so it’s important to know beforehand how long microblading takes for planning purposes. The average microblading appointment usually takes two hours from beginning to end, and preparation is key to the best results. Understanding the microblading process step by step helps you walk through the journey with confidence and clarity.
Consultation, Design, and Preparation
Consultation and Design Before any needles touch your skin, you’ll have a detailed consultation. This is where you discuss your desired brow shape, color, and thickness. The artist will analyze your face shape and natural brow growth to design the perfect brow outline. This step is crucial because it sets the foundation for your new look. Eyebrow mapping is done before the procedure where the artist will measure and draw the outline of the desired eyebrow shape. Then numbing cream is applied to the area.
Numbing To keep you comfortable, a topical numbing cream is applied to your brow area. This helps minimize any discomfort during the procedure. After microblading is complete your newly created eyebrows cannot get wet for 10 days. Which makes showering, washing your hair, and working out difficult. I recommend patients to purchase microblading face shields that they can use in the shower.
Shaping, Approval, and Tools
Brow Shaping - Shaping eyebrows correctly is the foundation to getting perfect eyebrows. Using what is called the golden ratio, your facial features, and some measuring, we draw the perfectly shaped eyebrows for your face directly on your skin for you to see. Approval - You take some time to examine your newly shaped eyebrows. We won’t move forward with anything until you are completely happy with your brow shape, and if that means some adjustments need to be made, then so be it.
Microblading Tool, Technique, and Stroke Creation Using a handheld tool with tiny needles, the artist creates fine, hair-like strokes by depositing pigment into the skin’s upper layers. This part requires a steady hand and artistic eye to mimic natural brow hairs.
Microblading Application and Immediate Aftercare
Microblading - All of the skills and mastery of technique from the studio come together to transform your eyebrows into a masterpiece. Using a microblade, ink is implanted into your skin by making microstrokes that resemble hair to give you the brows you’ve always dreamed of. After the initial strokes, pigment is applied over the brows to ensure the color settles well. Excess pigment is wiped away, and the artist checks for any areas that need touching up. The microblading process typically includes healing instructions and guidance for the aftercare period.
Care Instructions - As you’re looking in the mirror obsessing over your new brows, you’ll be instructed on the microblading healing stages, and how to take care of your microbladed eyebrows. We supply you with a special aftercare cream to help your brows during the microblading healing process, and then schedule your touch-up appointment for six to ten weeks later. The microblading process is finished and you have fallen in love with your eyebrows. People will notice your brows, and whether they say it or not, you’ll be the reason behind their eyebrow-envy.
Healing Stages and Long-Term Maintenance
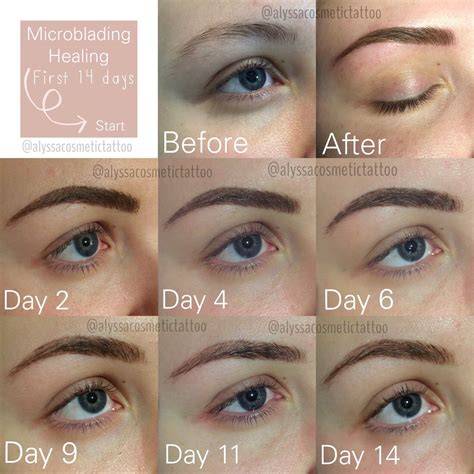
Understanding the healing timeline helps manage expectations. Days 1-3 reveal freshly microbladed brows that look bold and dark as pigment settles. Days 4-7 bring flaking and peeling, which should not be picked to avoid pigment loss. Weeks 4-6 involve a touch-up appointment, and long-term maintenance typically includes annual refreshers. Microblading typically lasts 1 to 3 years, depending on skin type and lifestyle.
Microblading Healing Stages: Phase 1 - Initial Healing (Days 1-7) includes slight tenderness, redness, and possible lymph fluid. Phase 2 - Flaking and Regeneration (Days 8-14) brings pigment movement as skin regenerates. Phase 3 - Color Stabilization (Days 15-42) sees pigment settling and color returning. By week 6-8, the final look is refined with a required touch-up to perfect density and color distribution.
Aftercare Instructions include avoiding water, sweat, and makeup on the brows for the first 7-10 days, using only approved cleansers and ointments as directed, and protecting from sun exposure. Two main aftercare approaches exist: Dry Healing and Wet Healing, each with its own pros and cons, and the choice depends on skin type and lifestyle. Consistency with aftercare is essential for optimal results.
Choosing the Right Artist and Safety Considerations
How to Choose the Right Microblading Artist includes checking Credentials and Training, reviewing Before and After Photos, reading Client Reviews, asking About Pigments and Tools, and ensuring Consultation Availability. Infections and allergic reactions are possible risks, so ask about sanitation practices and pigment safety. It’s important to avoid microblading if you’re pregnant or nursing, under 18, have a skin condition near the brows, or have a history of keloids or autoimmune issues.
Allergies, infections, poor outcomes, and granulomas are potential risks, though rare with a skilled artist and proper aftercare. In some cases, you may need to consider alternatives like brow lamination or eyebrow pencils for a non-permanent effect.
The Microblading Experience: Pain, Color, and Results
Does microblading hurt? Pain varies; most clients report minimal discomfort thanks to numbing creams. The pigment color is chosen to match your natural brow color and skin tone for a natural finish. Immediate results are visible after the session, with full results developing as the skin heals and the color stabilizes. A touch-up session around 6-8 weeks after the initial procedure helps perfect shape and density.
Cost and longevity vary by location and artist, but the average price is around $600, with variations depending on experience and demand. Touch-ups are common and may be included in some packages. Practical benefits include time savings, low maintenance, and a natural effect when well executed.
Remember: the final color and density depend on skin health, aftercare, and the technician’s skill. The healing process is normal and should be anticipated rather than feared, with the best results achieved through careful planning, patience, and professional guidance.
STEP BY STEP MICROBLADING TUTORIAL | Full Process
tags: #eyebrow #microblading #process