One of the most fantastic things about styling and cutting hair is that there are a ton of different techniques and styling tools including a razor haircut to create subtle yet impactful differences in how hair is cut.
This particular technique we’re going to discuss is often used in shorter women’s cuts, but it is equally viable for men’s grooming as well!
A styling razer is exactly what you might expect, it’s basically a straight edge razor that is used in achieving a certain effect on hair.
A razor cut starts out the same as any ‘ol haircut, you take the hair down with a standard scissor cut and shape the hair as desired.
However, the latter half of the haircut is finished with a razor as the finishing touch.
In general, there are only two types of razors used with this technique.
One is a standalone straight edge razor that an experienced stylist can use to great effect.
The other razer is one with a guard that prevents any mistakes or too much hair being shaved off due to inexperience or haste.
If you’re a stylist who just starting out experimenting with razer cuts, this is a fantastic tool to gain some experience doing razor cuts while also not demolishing someone else’s hair.
A razor is best used on hair that is thick and coarse but preferably not frizzy.
The razor will be typically pointed at a 45-degree angle (which is considered the best angle to use for this tool) and your stylist will make strokes towards your ends which will produce a messy and jagged effect that looks really good on short and messy styles like bobs and pixie cuts, however, it can also be used to great effect on longer styles as well.
The razor cut is a versatile styling technique that can produce a powerful jagged and whispy effect on the ends, unlike straight scissor cuts which end up being much more blunt on the ends which creates a more chunky look.
Be warned though, many people who go in for a razor cut for the first time end up being shocked and appalled the first time they do so.
When your stylist uses the razer to shave the ends of your hair, you’re going to hear an awful scraping sound that sounds like the stylist is doing something wrong or destroying your hair, this is not the case!
That’s just the sound of the hair being shaved by the razor and it is completely natural.
Razor cutting is a phenomenally useful technique, if you haven’t heard of it you haven’t been going to the right salons!
Many stylists shy away from doing razor cuts or suggesting them because it takes experience and a fair amount of skill to utilize a razor to its optimal effect.
Making a mistake such as razoring too deep along the shaft of the hair can create a flat look due to the fact that the hair no longer has any bulk for support.
Thankfully, at Salon 833 we have many experienced stylists who have a big toolbox to draw from to achieve any kind of haircut you can think of!
Hair stylists typically razor cut thick hair to thin it out, or to create a textured, feathery look.
If you have the proper tools and the right technique, then you can razor cut your hair at home.
First divide your hair into three sections-a top, middle and bottom section.
Starting with the bottom section, place the razor comb at a 45 degree angle relative to your hair.
Then lightly run the razor from the middle of your hair to the ends.
A razor comb is typically divided into three sections.
The end of the comb contains a regular comb.
The front of the comb is divided into two different sides: the small-toothed side and the wide-toothed side.
The wide-toothed side can be used to create choppy layers.
If you are a beginner, start out using the small-toothed side first.
Visit your local beauty supply store to purchase a razor comb and razors.
Razors are usually sold separately.
Use a brush to comb through your hair until it is smooth and all of the tangles are removed.
This will help to produce a more even cut.
If you are a beginner, it is recommended that you start with dry hair and make sure that your hair is completely straight before you begin, such as by using a flat iron.
Use clips or ponytail holders to divide your hair into a top, middle and bottom section.
The top section should be composed of the hair from the top of your head to the parietal ridge.
The middle section should be composed of the hair from your temples to your occipital bone.
Split it down the middle into two sections.
Starting on the right or left side, isolate a chunk of hair.
The chunk of hair should be about .4 to .5 inches (10 to 12 mm) thick in diameter.
Hold the section of hair straight out from the side of your head.
Starting two to three inches away from the root of your hair, position the comb at a 45 degree angle relative to your hair.
As you razor your hair, the cut hair will accumulate.
Once you are finished with the bottom section, use a ponytail holder to isolate it.
Then let down the hair in the middle section.
Let down the top section of your hair.
Divide the top section down the middle into two sides.
Working from the back, isolate a section of hair.
Position the blade two to three inches from the root of your hair.
Using very light pressure, move the razor in short, choppy motions from the middle down to the ends of your hair.
Since the hair at the top of your head is the most visible, make sure to use very light pressure and work slowly.
Do this for the rest of the sections at the top of your head until you have razor cut all of the sections.
Once you have cut all of your hair, brush through your hair one final time to remove any loose hair.
Do not start the razor at the roots of your hair.
Always start at least two to three inches away from the root.
With only a razor and a comb, you can razor cut your own hair at home.
Start by dividing your hair into 3 sections at the top, middle, and bottom, and secure each section with a hair tie.
To cut the middle and bottom sections, first gather a small section of hair at a time and place your comb at a 45-degree angle to your hair.
Then, move your razor in short, choppy motions from the middle down to the ends of your hair.
After each small section, comb the loose hair out so you can see how much you’ve cut.
To cut your top section, comb out small sections of your hair and hold it taut.
Then, cut the hair gently with your razor at a 45-degree angle.
Work slowly so you don’t risk cutting yourself.
Practical tips for achieving the best razor haircut
Razor cutting is a technique that requires control and a light touch to avoid creating a flat look by shaving too deeply along the shaft of the hair.
Starting with a dry and straightened base helps beginners see the cut more clearly and control the texture you want to achieve.
Common questions and expectations
Be prepared for an initial sound during the cutting process-the scraping is natural and not a sign of damage.
Razor cuts are especially popular for thick hair to create a textured, feathery look and to maintain movement in short shapes like bobs or pixie cuts.
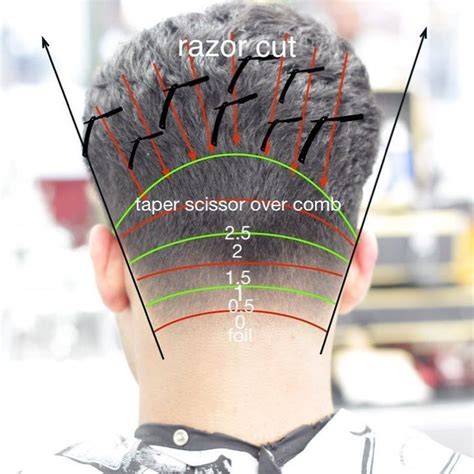
How To Cut Hair With A Razor | Texturising Razor Tutorial
In salons, experienced stylists use razors to achieve specific effects, while novice stylists may prefer guarded razors to prevent excessive hair removal.
| Section | Technique | Angle | Goal |
|---|---|---|---|
| Bottom | Razor comb at 45 degrees | 45° | Light taper toward ends |
| Top | Small sections, light pressure | 45° | Natural movement, textured ends |
Article Summary
With only a razor and a comb, you can razor cut your own hair at home, starting with three sections and cutting in short, choppy motions at a 45-degree angle to create a textured, natural look.