Eyelash extensions are one of the most popular beauty treatments around, giving you that effortless glam look without spending precious time applying mascara or false lashes. Wondering how to safely remove eyelash extensions at home? Should you remove lash extensions at home? Lash extensions can be removed from home but they must must be removed carefully so they do not cause damage to your natural lashes.
Although the appointment is usually quick, you may find it easier and more convenient to remove your lash extensions yourself at home. The most crucial rule is this: never pull eyelash extensions off. Pulling at each lash extension will prematurely remove the natural lash, which is especially detrimental if the lash is still in the ‘anagen’ phase. It could take up to 8 weeks for your regrowth. Before you make a start, make sure you have all the products you need around you, and a clean space to work with.
Choosing the right removal method
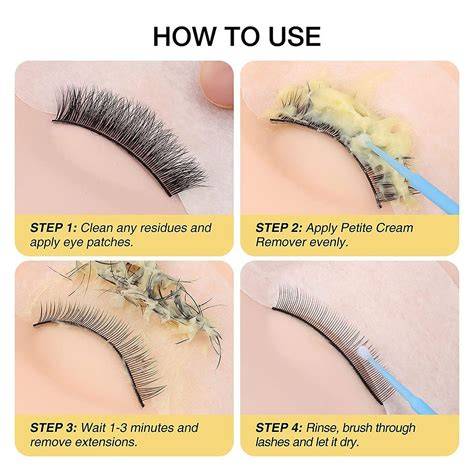
We know cleansing your lash extensions might seem scary but using a gel makeup-remover will glide over your lashes without any uncomfortable tugging on the adhesive bonds. The best way to remove eyelash extension glue is with a professionally formulated Lash Extension Remover. Using home remedies like castor oil or Vaseline can be dangerous as they have not been formulated for safe use around your eyes and can take hours to have any effect. Our Eyelash Extension Remover uses a kind-to-skin formula to carefully soften the bonds used to apply the individual lashes. This gently removes the lash extensions exactly like a salon removal, without damaging or pulling out your own eyelashes.
Brush again. It might be a shock going from long fluttery lash extensions to seeing your natural lashes but take this as your opportunity to really care for your lash and eye area. After removing your lash extensions, you need the right aftercare to give your natural lashes a boost of conditioning nourishment. Caring for natural lashes using a conditioning lash serum can help restore any moisture loss that may have occurred during your lash extension removal. Our Lash & Brow Conditioning Serum provides an intense boost of nourishment and improves the structure of hair fibres, for stronger, healthier lashes. Preparations for your next eyelash extensions suggest following proper aftercare so your lashes are ready for the next appointment.
Step-by-step at-home removal options
- In-salon removal is the safest option if you can schedule it, but at-home removal is possible with care.
- If you prefer an at-home method, steam can help loosen the glue. Wash your face with a mild cleanser, then hold your face over a bowl of steaming water for 10-15 minutes, keeping a safe distance. The steam should soften the adhesive and allow lashes to glide away more easily when gently tugged at the base.
- Alternatively, use a lash removal gel to dissolve the glue: close your eyes and apply the gel along the lash line, wait about 3 minutes, then rub away the gel, dissolved glue, and loose eyelashes with a damp cloth.
- Oil-based removers, such as olive oil or coconut oil, can also help loosen the glue. Soak a cotton pad in oil, place over the lashes for a few minutes, then gently wipe away any remaining extensions and glue.
- Castor oil is cited as a helpful nightly treatment to break down adhesive bonds and nourish natural lashes after removal. Apply with a Q-tip to avoid contact with eyes.
- If lashes are stubborn, repeat the steaming or oil treatment, then gently remove sections from the outer corners toward the inner corners, never pulling directly on a lash.
- After removal, cleanse the eye area with a mild facial cleanser and pat dry. Apply a conditioning eyelash serum to support lash health during recovery.
In case of discomfort, irritation, or lashes growing in odd directions, seek professional removal. A lash technician has the tools and expertise to protect your natural lashes and ensure complete removal without damage. Quality eyelash extensions are adhered individually with a safe adhesive, so DIY removal carries risks to lash health if not done properly.
Tips and cautions for at-home removal
- Never pick, tug, or pull at lashes. This can damage natural lashes and disturb the lash growth cycle.
- Use products specifically designed for lash extension removal or recommended safe alternatives; avoid untested home remedies around the eye area.
- Perform removal in a clean, well-lit space with minimal distractions and away from eyes. Tie back hair and prepare a gentle cleanser, remover, oil, and a cloth or cotton pads.
- If pain, redness, or irritation occurs, stop and consult a professional.
Post-removal care for natural lashes
After removal, treat your lashes gently to recover and strengthen them. A lash conditioning serum can help restore moisture and improve lash fibre structure, supporting healthier lashes for your next extension cycle. Maintaining lash hygiene with a lash cleanser helps prevent buildup and ensures eye area health during the transition back to natural lashes.
As an alternative to DIY removal, you can rely on professional services. They have the right tools and expertise to safely remove lash extensions and protect your natural lashes. If you’re unable to visit a salon, you can discuss with your lash artist about at-home removal options or a guided at-home removal routine.
4 Ways to Remove Eyelash Extensions (For Fills!)
tags: #how #to #remove #individual #lash #extensions