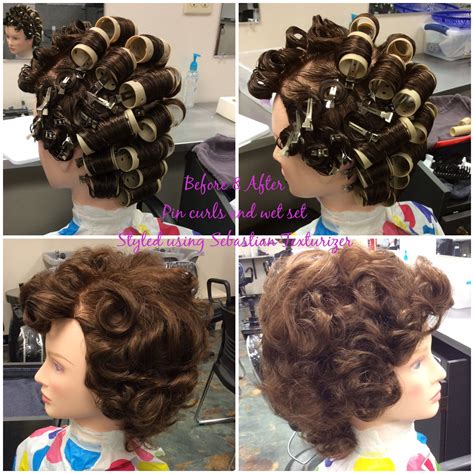
For true beginners please note that an overnight wetset is not the only option for achieving vintage waves. There are also foam rollers, which are easier to apply but can have varying results, and may also take a bit of practice. For ladies who have serious humidity and frizz problems with their hair they can hotset their hair. There’s several options for this, including hot rollers, hot sticks, and also heated pincurls, where you use heated curling tongs to create the curl that is created by hand in the winding process of wetset pincurls, then secured in the same way as wet pincurls as an elevated or flat pincurl.
First of all you should know what kind of things you’ll need. For the actual wetset you will need 1) A comb, 2) one or two sectioning clips, 3) an implement to easily section and part your hair, such as a rat’s tail comb/teasing brush, 4) setting lotion, 5) a silk, satin or nylon headscarf, and 6) pincurl clips. I got mine on eBay, a pack of 50 so that I have plenty even after losing some, though a full head of thick hair might even use all of these. Personally I prefer the clips that have a slight curve to them because they fit more comfortably against the curvature of the skull, making them more comfortable to sleep in.
Finding the right setting lotion that works for your hair can be a trial and error process. They can leave your hair crunchy if you overapply or the lotion is especially strong hold, while others don’t hold strongly enough. I personally love Motions At Home Foaming Wrap Lotion. It has a good hold but also leaves your hair feeling soft and non-crunchy. It’s reasonably priced and easy to get a hold of online. I get mine from Amazon. But there are other setting lotion options, of course, and feel free to look up reviews on other lotions popular among the pinup community.
There are two types of pincurls, elevated pincurls and flat. The difference is exactly as you would imagine: for elevated pincurls the curl stands elevated from your scalp, and in flat pincurls the curl is clipped flat to the scalp. I’ll show you how to do both. You can decide after some practice which type you prefer, and consequently do your full head in only that style. Elevated pincurls will dry faster because air circulates through them easily, and they also provide more volume because the hair dries elevated at the root.
There are different setting patterns-a setting pattern refers to the direction in which your create your curl, hair rolled up towards the head or under towards the head, and also referring to the direction you create that curl, either forward towards the face or towards the back of your head when talking about flat pincurls, or with the roll of the curl directed towards either ear when talking about elevated pincurls. Different patterns will create different wave formations, but I am definitely out of my depth in advising specific patterns so I would advise you to do some research on your own if you want to get really intricate on this. For now, as a beginner, following my routine will probably serve you just fine as you get some pincurl practice under your belt.
The final thing you should know before I show you the How To is that the longer you leave your pincurls in the better the curl will be, and the longer it will hold after brushing out. You must allow your hair to dry fully before you brush it out, because damp curls will droop and will not be properly formed. If you still have some dampness at the time you must take out your hair and don’t have another hour or two to spare to allow it to dry completely then carefully use a hairdryer to finish drying the curls, then allow the hair to cool completely so that the hair can cool into its set.
Additional tip: Make sure you are wearing a top that either has a large head hole or straps. Basic information imparted, please now cut me some slack about how silly I look wet haired, half pincurled, and beheadscarfed as we enter the pictorial portion of this post, and let’s hold hands and do this! Well, maybe you should just hold my knee. I’ll need my hands free, after all.
The first thing you need to do after washing and conditioning your hair is gently towel it off so that it’s not sopping but is still damp. Comb through your hair, apply argan oil if you would like to, then apply your setting lotion. When I put in pincurls I work in rows from the front of my head to the back. Working row after row down my head until completed, but it’s up to you whether you work instead in columns from the crown of your head down towards your neck, creating columns lining up towards the back of your head as you go, if you prefer. It doesn’t make a difference, you’ll still curl all the hair, it just depends what you find is easier in terms of visibility and accessing the uncurled hair as your head of pincurls build up.
Divide off a section of your hair at the top of your head on the large side of your parting, roughly 1-1.5 inches wide, and clip back the rest of your hair. Divide that row into sections of hair also about 1 inch deep, most likely meaning you will have 3 or 4 sections of hair in this row. Take your first piece of sectioned hair. Starting at the hair ends, pinch the tip between your thumb and forefinger. Create a circle by curling the tip up to touch the shaft of hair on the hair’s underside, with the curl sitting so that the completed curl will be facing away from your parting, towards the side of your head. Keeping the tip of hair pinched between your fingers so that it doesn’t come loose, continue rolling your hair down towards your scalp to reach your head, keeping the pincurl as neat and circular as you can. Take a pincurl clip and carefully secure the pincurl to the hair at your scalp. Repeat this step with the other pieces of hair in your row. When complete, change sides of your head to the other side of your parting. Create a row of pincurls in the same way, but instead of curling towards my left side as I did in these photos, curl your hair still towards the underside but so that the curl faces down the side of your head that has the smaller side of your parting, away from your parting.
To create flat pincurls on the rest of your hair you section your hair into rows and create pincurls in the exact same way and identical directioning as with the first 3 rows. But instead of securing the pincurl with the curl sitting atop your scalp, with the clip at the base of the curl, gently angle your curl flatter against your head and wind the pincurl a little extra if you feel the curl would be sitting too far below the section of hair you are creating the pincurl from. Use a pincurl clip as before, placing wherever will best hold the curl in place securely and without squashing the circle shape you have created. Repeat this until you have done your entire head of hair.
It’s trickiest at the back of your head, and you will definitely get achey arms at first. Tie your headscarf into place so that it keeps your curls secure. You should aim to have your pincurls in for 10 hours at least if possible if you have midlength hair. Shorter hair, a la Marilyn Monroe length, may need less time, I’m unsure as I have hair that sits a few inches below my shoulders. Very long hair will likely need even longer, the only way to tell is to put in a set and clock how long it takes for your curls to totally dry.
Once they’re dry, fetch the following. 1) A smoothing brush, I like my Denman’s one, 2) a few sectioning clips, 3) hairspray, 4) argan oil or pomade for defrizzing and sculpting. Remove the pincurl clips. Many pinups comb their fingers gently through their hair to separate the curls but I don’t do this as this gives me frizz, so give it a go doing it both ways on different sets to see what your hair does. Brush out your hair using your smoothing brush gently, brushing your hair against your hand to help control frizz. To get your curls to tuck under you must hold your hand on the outside of your hair and brush from the underneath, twisting the brush to encourage the curl to curl under with the motion. Keep brushing the hair until the curls start to take the shape you want. This can take quite a while, especially if you’re not used to it. To smooth out babyhairs or combat frizz use only a tiny bit of argan oil or a tiny bit of pomade. Too much of either can’t be undone and will leave your hair looking greasy, so be cautious rather than liberal.
As I brushed out my hair I decided I liked the shape it had created today without putting in my usual wave, so I skipped it. I can show you how to create a wave another time, but for ladies just starting out who are intimidated by a big peak, or those who simply don’t like it, your process ends here. If I ever find I have hair that doesn’t settle smoothly at my crown after brushing then I smooth the hair out by hand and use a sectioning clip to hold it into the place I want it to take, then spray and give it 5-10 minutes to set. Spray your whole ‘do when you’re happy with the way it looks. Leave the sectioning clips in as you finish preparing for your day, then remove just before you leave the house.
Don’t be discouraged if your hair doesn’t turn out the way you imagined. My wet pincurls I created in this pictorial are nowhere near as neat as they ought to be in theory, and while my hair certainly isn’t perfect after my brush out it still produced a pretty good set. If you’re unhappy with your results then remember that hair flowers, bandannas and hair scarves are a god send in helping hide the rougher parts of a set. Failing that you can salvage a bad set by styling it into victory rolls, suicide rolls, and bumper bangs with a little practice there too, so don’t freak out if you end up with a brush out that doesn’t curl as it should. Breathe, reach for some bobbypins and a nylon scarf, and you’ll be fine. Over time you’ll find the action of pincurling easier and quicker, and you’ll get the knack of brushing out without creating too much frizz. Your hair, too, will adjust.
For video tutorials of how to do pincurls there’s no better place than YouTube. If you look yourself you’ll find dozens, but the one I recommend most, and the one I watched when I began the process, is this PinupDollAshleyMarie Authentic Pincurl tutorial video. Pinupdollashleymarie is great in general for all sorts of retro hair style tutorials, so definitely give her other videos a watch. Cherry Dollface is also a top recommendation YouTuber for retro hair tutorials, so check out her channel too, but she tends to use heat pincurls so I’m not sure she’ll have a video showing this specific process I was talking you through. This video shows you how to actually form pincurls, but they’re doing it on dry hair rather than wet. There you go, that’s the basics on how to wetset pincurl your hair. If you have any questions then just ask in the comments, but hopefully I’ve given you a good place to start and to get practicing.
- Choose between elevated or flat pincurls based on your preferred volume and drying pattern.
- Prepare hair with proper setting lotion and secure each curl with clips.
- Let curls dry fully for best hold, then brush out gently to reveal waves.
- Finish with light styling products to control frizz and set the shape.