If the almighty hair care gods didn't grant you naturally curly hair, you've likely clocked your fair share of time in front of YouTube tutorials on how to curl hair. Curling irons are indeed magical little devices that can turn straight hair curly in an instant, and simply add definition and perfection to natural curls.
But as easy as that last declarative statement sounds, they can actually be quite tricky to master. That's why we went to a pro to get the 411 on the best types of irons for your hair type and texture, the tried and true methods for how to curl hair into a lasting look, and the expert techniques that will turn your hair into frizz-free ringlets every time you style. Skip to see hair care tips on how to curl hair like a pro now.
The curling iron is by no means a modern invention; people have been using them to add texture to their hair for eons (think ancient Greece, not caveman days). In fact Babylonian and Assyrian men crimped and curled their beards with curling irons (freaky fact, but yes, it's true).
Of course these curling irons didn't look anything like the electrical curling irons we know and love today - they didn't debut until around 1959 thanks to BaByliss, and we're assuming women or men today don't use them to curl their beards (not that we're ones to judge), but it's interesting to know that the desire to have curly hair dates way back.
So whether you're after tightly wound ringlets or tousled, beachy waves, this guide on how to curl hair will help you master the curling iron once and for all.
Choosing the Right Curling Iron for Your Hair Type
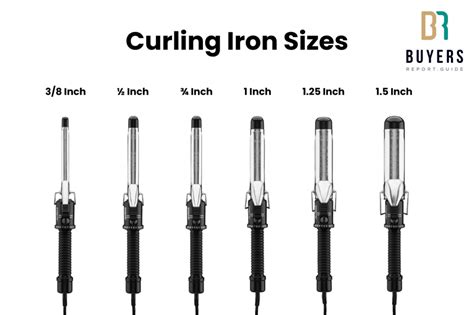
Different hair textures respond best to different barrel sizes and heat settings. For tight curls, a smaller barrel (0.75-1 inch) works best, while larger barrels (1.25-1.5 inches) create loose waves or soft curls. Fine or damaged hair benefits from lower heat and shorter styling times, with ceramic or tourmaline barrels helping to reduce frizz and distribute heat evenly.
For thick, coarse, or naturally curly hair, a higher heat setting and a larger barrel can help you achieve defined curls without excessive repetition. Always start with a heat protection product and a heat setting appropriate for your hair to minimize damage.
Preparation: Prime Your Hair for Curling
Begin with clean, dry hair. Apply a heat protectant evenly from roots to ends, then a light styling product such as a setting spray or light mousse to hold the curl without weighing hair down. Make sure hair is fully dry before curling to prevent steam damage and uneven results.
Classic Curling Method: Step-by-Step
1. Section hair into manageable parts to ensure each strand receives even heat.
2. Take a small section, clamp near the roots, and wrap the strand around the barrel away from your face.
3. Hold for 8-12 seconds, depending on your hair type and the iron's heat.
4. Release gently and let the curl cool in your hand before moving on.
5. Repeat across the head, then gently finger-comb or brush the curls once cooled to set the shape.
For a longer-lasting look, avoid brushing hot curls and use a finishing spray to lock the style in.
Techniques for Different Results
To achieve beachy waves, alternate the direction of each curl or wrap hair around the barrel in a snake-like pattern. For tight ringlets, curl small sections in a uniform direction and hold slightly longer. If your goal is volume, curl away from the crown and tease lightly at the roots after cooling.
If frizz is a concern, consider finishing with a serum or oil glow on the ends and a light mist of a flexible-hold hairspray to keep curls defined without stiffness.
Care After Curling: Maintenance Tips
Cool curls completely before fluffing, which helps set the shape. Use a silk or satin pillowcase to reduce friction while you sleep, and refresh curls with heat-free methods or a quick touch-up using the curling iron at a lower temperature if needed. Regular trims help maintain curl integrity by removing split ends that travel up the strand and disrupt the pattern.
Common Pitfalls and Fixes
Overheating can cause damage and brittle curls, while using a barrel that’s too large for tight curls leads to less definition. If you notice limp or overly crunchy curls, reassess heat settings, section sizes, and products used. Adjusting technique and equipment can dramatically improve results.
Table: Quick Reference for Curling Iron Choices
| Hair Type | Recommended Barrel | Heat Setting | Notes |
|---|---|---|---|
| Fine/Damaged | 0.75-1 inch | Low to Medium | Ceramic or tourmaline for even heat |
| Medium/Coarse | 1 inch | Medium to High | Protective products essential |
| Thick/Curly | 1.25-1.5 inches | High | Better for defined waves or curls |
Bouncy Curls Tutorial: Tips for Massive Volume with a 33mm Iron!
Whether you aim for tight curls or soft waves, this approach helps you master the curling iron with confidence and achieve consistent, frizz-free results.